Textures, names & files
Where your textures, names, and sounds come from, and the folder layout that makes it all automatic.
Code registers what exists; assets decide what it looks, reads, and sounds like. The good news in this page is how little wiring there is: drop files in the right folders with the right names and RetroAPI finds them. The folder names are the API.
The assets folder, top to bottom
Everything lives under one root, and that root's name must equal your mod id, the same example_mod from fabric.mod.json. Here is the showcase's tree:
assets/example_mod/
├── icon.png                          # the mod's icon (fabric.mod.json points here)
├── lang/
│   └── en_US.lang                    # display names & achievement text
├── textures/
│   ├── block/
│   │   ├── example_block.png
│   │   ├── sided_block_top.png
│   │   ├── sided_block_bottom.png
│   │   ├── sided_block_side.png
│   │   ├── counter_block.png
│   │   ├── crate_block.png
│   │   ├── freezer_front.png
│   │   ├── freezer_side.png
│   │   └── freezer_top.png
│   ├── item/
│   │   └── suspicious_substance.png
│   └── gui/
│       ├── crategui.png
│       └── freezer.png
└── sounds/
    └── sound/
        └── counter/
            └── click.ogg
If textures don't show up, the first thing to check is that the folder is named exactly your mod id. assets/ExampleMod/ or assets/example-mod/ will silently load nothing.
Block & item textures: atlased sprites
The simplest case is the one from the elevator pitch, a single texture chained onto the builder:
EXAMPLE_BLOCK = RetroBlockAccess.create(Material.STONE)
	.texture(id("example_block"))   // → textures/block/example_block.png on all 6 faces
	.register(id("example_block"));
That .texture(id("example_block")) loads assets/example_mod/textures/block/example_block.png onto all six faces of the block. Items follow the parallel path: .texture(id("suspicious_substance")) loads textures/item/suspicious_substance.png. The convention is just folder-by-kind: blocks read from textures/block/, items from textures/item/.
These textures are atlased. Beta's renderer doesn't bind a texture per block, it draws from one big sheet (terrain.png for blocks, gui/items.png for items) and addresses each tile by a sprite index. Vanilla fills the low indices; RetroAPI assigns your sprites slots ≥ 256 and composites your PNGs onto the sheet client-side at load. Under StationAPI (if present) it re-resolves your sprites into StationAPI's atlas instead, via RetroTextures.resolveStationAPITextures(), you write the same code either way.
The handle these calls track is a RetroTexture, and its public int id field is the live sprite index, the number the renderer hands the tessellator. You'll use it directly in the next section and in Blocks's sided block.
Remember from Entrypoints & sides: reserving these slots is pure bookkeeping, so it runs on a dedicated server too. Only the client ever decodes the PNG and paints the atlas.


Multi-texture blocks
A block with a different face per side calls RetroTextures.addBlockTexture(id) once per texture and overrides getTexture(face) to return the right sprite index. That's a whole topic, the sided block, with its three textures and the RetroTexture.id trick, and it gets a full walkthrough in Blocks. Pointing you there rather than repeating it.
Reusing vanilla sprites, no PNG needed
Sometimes the texture you want already ships with the game. You can borrow a vanilla sprite index two ways:
- On a block builder,
.sprite(Block.GLASS.getTexture(0)), the portal block in Blocks does this to look like glass, shipping no texture of its own. - On an item subclass, override
getTextureId(damage)to return another item's index. The Jump Stick in Items returnsItem.STICK.getTextureId(0)and so needs no art at all.
Animated textures
Textures animate now. Drop a {name}.png.mcmeta next to the PNG and stack the frames as square tiles in a vertical strip (a 16×64 image is four 16×16 frames), and the ordinary .texture() call picks the animation up with no other change. If you'd rather drive it from code, RetroTextures.addAnimatedBlockTexture(id, frameCount, ticksPerFrame) and addAnimatedItemTexture(id, frameCount, ticksPerFrame) do the same in one line. The full schema, interpolation, and the showcase's ember block live in Models & render layers.
The same path works for items: the showcase's Spectre Staff is a plain RetroItemAccess item whose texture is a 16×208 strip (thirteen 16×16 frames) with a spectre_staff.png.mcmeta beside it. Its mcmeta also shows the per-frame timing form, a frames list of indices with one entry written as {"index": 8, "time": 9} to hold that frame longer, so an animated item is nothing more than the strip plus its mcmeta and a normal .texture(id("spectre_staff")) call:
{
    "animation": {
        "frametime": 3,
        "frames": [0, 1, 2, 3, 4, 5, 6, 7, {"index": 8, "time": 9}, 9, 10, 11, 12]
    }
}
GUI textures: bound directly, not atlased
Window art is different. A GUI background is too big to live in the terrain atlas, so it isn't atlased at all, you bind it straight from its classpath path through the vanilla texture manager. Here's the crate screen's background draw:
private static final String TEXTURE = "/assets/example_mod/textures/gui/crategui.png";

@Override
protected void drawBackground(float tickDelta) {
	int texture = this.minecraft.textureManager.getTextureId(TEXTURE);
	GL11.glColor4f(1.0F, 1.0F, 1.0F, 1.0F);
	this.minecraft.textureManager.bindTexture(texture);
	int left = (this.width - this.backgroundWidth) / 2;
	int top = (this.height - this.backgroundHeight) / 2;
	this.drawTexture(left, top, 0, 0, this.backgroundWidth, this.backgroundHeight);
}
textureManager.getTextureId(path) loads the file (cached after the first call) and returns an OpenGL texture handle; bindTexture makes it current; drawTexture blits a region of it to the screen. Note the leading slash and the full /assets/<modid>/... path, this is a raw classpath lookup, so it must be exact.
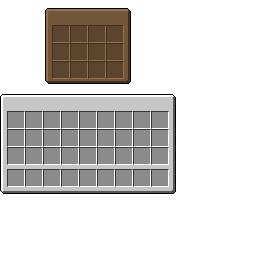
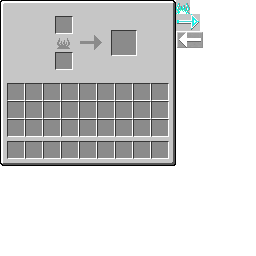
Both GUI sheets are 256×256. The crate window uses the top-left 176×222 region; the rest of the sheet is free space. The freezer reuses the vanilla furnace layout, which means it keeps its progress-bar sprites at u ≥ 176, the same column past the 176-pixel-wide window where vanilla's furnace.png stores the flame and arrow sprites it blits over the GUI as fuel burns. The freezer's animated bars are Block entities & GUIs's story.
Lang files: names without code
RetroAPI loads assets/<modid>/lang/en_US.lang automatically (and, if StationAPI is present, also assets/<modid>/stationapi/lang/en_US.lang). Here is the showcase's, in full:
# Display names for the mod's content. RetroAPI loads this file automatically
# (assets/<modid>/lang/en_US.lang). The @ is replaced with your mod id at load
# time, so these lines work even if you rename the mod.
#
# Anything you don't translate gets an auto-generated default from its
# identifier (example_block -> "Example Block"), so missing lines never crash.

# Blocks: tile.<modid>.<identifier>.name
tile.@.example_block.name=Example Block
tile.@.sided_block.name=Sided Block
tile.@.example_pipe.name=Example Pipe
tile.@.counter_block.name=Counter Block
tile.@.crate_block.name=Crate
tile.@.freezer_block.name=Freezer
tile.@.example_portal.name=Example Portal

# Items: item.<modid>.<identifier>.name
item.@.suspicious_substance.name=Suspicious Substance
item.@.jump_stick.name=Jump Stick

# Achievements: achievement.<name> is the title, achievement.<name>.desc the
# description, where <name> is the string passed to RetroAchievements.register.
achievement.example_mod.getting_started=Getting Started
achievement.example_mod.getting_started.desc=Join a world with the example mod installed.
achievement.example_mod.jump_for_joy=Jump for Joy
achievement.example_mod.jump_for_joy.desc=Jump!
achievement.example_mod.dimensional_traveler=Dimensional Traveler
achievement.example_mod.dimensional_traveler.desc=Step through the example portal.

# Title of the mod's own achievement page (the < > buttons on the achievements screen).
gui.retroapi.achievementPage.example_mod.example_page=Example Mod
A few things worth pinning down:
- The
@is replaced with your mod id at load time. Writetile.@.example_block.nameand it becomestile.example_mod.example_block.name. Rename the mod and the lang file follows along untouched. - Key formats:
tile.<modid>.<identifier>.namefor blocks,item.<modid>.<identifier>.namefor items,achievement.<name>andachievement.<name>.descfor achievements, andgui.retroapi.achievementPage.<namespace>.<identifier>for a custom achievement page title. - Missing lines never break anything. Anything you don't translate gets an auto-generated default derived from its identifier,
example_blockbecomes "Example Block", so a half-finished lang file shows readable placeholders, not raw keys.
RUBY_ORE = RetroBlockAccess.create(Material.STONE)
    .register(id("ruby_ore"));   // shows as "Ruby Ore"
With no translation present, RetroAPI generates a readable name from the identifier and notes it in the debug log. Fine while prototyping; ship a lang file before release, because generated names cannot be translated.
tile.example_mod.ruby_ore.name=Ruby Ore
item.example_mod.ruby.name=Ruby
The real answer: one line per name, per language, and a translation pack can add languages you never wrote.
Sounds: the autoloader
Custom sounds need no registration call at all. RetroAPI scans assets/<modid>/sounds/<channel>/<path>.ogg and derives an event id from the path. The channels are sound/ (the usual effects), music/, and streaming/, plus a stationapi/ root scanned the same way when StationAPI is present.
The id derivation, step by step:
- Strip the
.oggextension. - Turn directory slashes into dots.
- Lowercase the whole thing.
- For the
sound/channel only, collapse a trailing digit so numbered variants share one event,call1.oggandcall2.oggboth register the eventcalland play a random one. - Prefix
<modid>:.
The showcase ships one sound: sounds/sound/counter/click.ogg. Walk it through, strip the extension (counter/click), slashes to dots (counter.click), lowercase (unchanged), prefix the mod id, and you get the event id example_mod:counter.click. The counter block plays it on every right-click:
world.playSound(x + 0.5, y + 0.5, z + 0.5, "example_mod:counter.click", 1.0F, 1.0F);The two floats are volume and pitch. Offset by +0.5 on each axis to play from the block's center.
That's pixels, names, and sounds handled, the quiet half of every feature. Now the loud half: let's build some blocks.